Days Gone: Night Survival and Scavenging Guide
Deacon St. John departs from the O'Leary Mountain safehouse to pursue a mission objective across the Oregon wilderness. The journey involves navigating treacherous roads filled with abandoned vehicles and hostile Freakers. Tactical driving and occasional melee combat are showcased as Deacon maneuvers his motorcycle through dark tunnels and over mountain passes. Essential survival activities like refueling at a gas station and scavenging scrap from abandoned cars for repairs are demonstrated throughout the journey. A key moment features Deacon intervening to rescue a hostage from a group of Swarmers, subsequently directing the survivor to a nearby encampment. The gameplay highlights the importance of resource management and constant vigilance in a post-apocalyptic environment. Exploration of a desolate landscape yields valuable resources as abandoned vehicles like fire trucks and SUVs are scavenged for parts. The journey continues through dilapidated cabins where further supplies are gathered, though the quiet is quickly broken by a sudden attack from several Freakers. A brutal melee battle ensues before the protagonist escapes on his motorcycle, navigating forest paths to reach the fortified Hot Springs camp. Upon entering, a tense dialogue sequence introduces the camp's leaders, Tucker and Alkai, who are embroiled in a heated argument regarding camp security and the looming threat of the Rippers. The segment concludes with a guided tour of the camp's labor-intensive operations via a golf cart, where the harsh reality of survival under Tucker's rule is revealed alongside a new objective to locate a missing person. Deacon St. John arrives at the Hot Springs camp in the post-apocalyptic world of Days Gone. He approaches the local merchant, Alkai, triggering a cinematic conversation about the Rippers and a potential price on Deacon's head. Following the exchange, the gameplay transitions to the merchant interface, where various weapons such as the .22 Repeater, Combat Shotgun, and sidearms like the SAP9 are examined. Deacon then makes a pivotal decision regarding a recovered drug stash, ultimately choosing to hand it over to Ada Tucker, the camp leader, which bolsters his trust level with the community. This choice leads to the completion of the 'Price on Your Head' mission. Afterward, Deacon returns to the armory to invest in new gear, purchasing a rifle and specialized suppressors for his firearms. As dusk settles, he navigates the camp to the bounty station, trading collected Swarmer ears for camp credits. His routine continues at the mechanic station, where he ensures his motorcycle is fully fueled and repaired for the journey ahead. The video concludes with Deacon reviewing the regional map and his character's current skill progression before riding out into the dark, forested trails beyond the safety of the camp gates. Deacon St. John traverses the treacherous landscapes of post-apocalyptic Oregon on his drifter bike. Under the cover of night, he navigates overgrown dirt paths and dilapidated highways, passing through abandoned towns and NERO checkpoints. The journey is punctuated by radio broadcasts from Copeland and Tucker, providing context to the harsh world. Deacon employs a mix of high-speed travel and careful stealth, frequently stopping to eliminate freakers using silent kills with his crossbow or brutal melee strikes with a spiked club. He utilizes the environment, such as tall grass, to remain undetected by larger groups of swarmers while scavenging for supplies and completing objectives in this open-world survival experience. Deacon St. John navigates a derelict gas station and industrial area heavily infested with freakers. He employs stealth to move through the environment, utilizing rooftops and large shipping containers to stay above the ground-level threats. The mission involves systematically locating and destroying infestation nests using incendiary devices. Each successful burn triggers a localized swarm of aggressive freakers, necessitating quick tactical retreats to elevated positions or engagement in high-stakes melee combat. Between encounters, resources are scavenged from abandoned police vehicles and crates to maintain ammunition and crafting supplies. Radio communications provide narrative context regarding missing allies while Deacon tracks his progress via a detailed regional map. Tactical gameplay in Days Gone features Deacon St. John methodically clearing an infested area. He begins by using stealth in high grass to observe Freaker movements near a highway with abandoned vehicles. Deacon executes silent kills to thin out the herd before using distractions like rocks and attractors to manipulate enemy positioning. The core objective involves locating and destroying multiple Freaker nests located in buildings and vehicles. Deacon utilizes Molotov cocktails to ignite these nests, which triggers an aggressive response from nearby Freakers. Throughout the mission, Deacon manages his resources, switching between a crossbow for silent ranged attacks, a pistol for close encounters, and explosives to manage swarms. The footage culminates in an intense firefight around an abandoned motel complex, where Deacon effectively uses the environment to maintain distance and eliminate the final threats, successfully clearing the infestation. A lone survivor navigates the treacherous landscape of the Pacific Northwest, focusing on clearing a Freaker infestation at the Crazy Willie's motel area. Utilizing a suppressed handgun, multiple enemies are picked off from a distance with precision headshots to maintain a low profile and avoid alerting the horde. The survivor carefully loots the environment, checking car trunks and building interiors for essential crafting materials like scrap, rags, and kerosene. After locating a standard baseball bat, it is upgraded into a lethal spiked variant for improved melee efficiency. Continued exploration of the motel rooms leads to the discovery of nest residue and a hidden safe combination. Using the combination, a strategic attractor is retrieved from the main office safe. After reviewing the regional map to pinpoint remaining objectives, the survivor employs Molotov cocktails to incinerate various infestation nests scattered around the property. The resulting chaotic encounters with emerging Freakers are managed through tactical positioning and a combination of firearms and melee strikes. Upon successful completion of the mission, the survivor accesses an extensive skill tree to invest earned points into survival and combat proficiencies, specifically mastering the Hawkeyed and Field Repairs abilities. Deacon St. John navigates the treacherous post-apocalyptic landscape of the Pacific Northwest, starting with a strategic upgrade to his survival skills. The journey moves through a series of tactical engagements, beginning with the silent elimination of hostile Rippers near a fuel refinery. Resource management remains a critical focus as the environment is meticulously searched for scrap, medical supplies, and ammunition within abandoned roadside structures and a derelict motel. Maintenance of the motorcycle is showcased through refueling stops at both a functional pump and via scavenged gas canisters found in dark, car-choked tunnels. The intensity escalates with a transition into rainy conditions where a bounty mission is initiated, leading to a high-speed pursuit on slick mountain roads. This chase involves mobile combat, utilizing sidearms to disable a target's vehicle while navigating through dense forests and avoiding environmental hazards. Deacon St. John engages in a high-speed motorcycle pursuit through a dense, rain-slicked forest, targeting a fleeing drifter. The chase involves tactical shooting while riding, navigating tight trails, and eventually forcing the target to crash. Following a brief cutscene where the drifter is restrained, the mission 'Drugged Outta His Mind' concludes with rewards for Copeland's Camp. Deacon then repairs his bike and sets off across the wilderness toward his next objective at Sarah's Memorial Stone, pausing to forage for local flora like Mountain Sorrel and Horn of Plenty. The remainder of the footage transitions into an extended period of inactivity with a blank screen display. 📖 Chapters: 0:00:00 - Departure from O'Leary Mountain safehouse 0:02:15 - Nighttime travel and initial Freaker encounters 0:05:40 - Navigating highway blockades and tunnel passage 0:08:50 - Refueling the motorcycle at a derelict gas station 0:12:10 - Hostage rescue and bridge combat encounter 0:15:20 - Scavenging for scrap and medical supplies 0:18:45 - Arriving at Hot Springs: Tucker and Alkai interaction 0:21:00 - Mission 'Price on Your Head' and weapon upgrades 0:25:30 - Clearing Freaker infestation zones 0:42:55 - Reaching the Motel Infestation Hub 0:50:00 - Tactical stealth and silent takedowns 0:55:30 - Incinerating nests with Molotov cocktails 0:59:00 - Character progression and skill tree upgrades 1:09:20 - High-speed Biker Bounty pursuit and shootout 1:13:14 - Mission completion and bounty rewards 1:16:05 - Transition to extended inactive sequence 1:20:01 - Video Conclusion
Related Videos

HITMAN: Slim Shady Elusive Target | The Reflection | Suit Only, Silent Assassin #SlimShady #Hitman
The video begins with a loading screen displaying the target, Slim Shady. Agent 47 enters a psychedelic, neon-lit corridor, walking past multiple digital portraits of the target. Arriving at a modern facility, dressed in a blue 'Shady' robe, Agent 47 receives instructions to eliminate Slim Shady. He navigates through various sections of the building, which includes a hot spring area and a snowy outdoor landscape. Stealth is emphasized as he avoids patrolling guards and snowmobiles. Agent 47 finds a screwdriver and enters a blue-lit interior stairwell, leading to a mortuary. Inside, he silently subdues a guard and disposes of the body in a mortuary cooler. He then disables a camera recording device. Further into the mortuary, Agent 47 observes what appears to be Slim Shady on a gurney, surrounded by medical staff in a red-lit environment. He picks up a scalpel, then bypasses more guards in the mortuary before moving towards another stairwell. An announcement from Slim Shady echoes, directing everyone to watch his show. Agent 47 silently takes down a person in a green scrub suit and conceals the body. He then strategically throws a banana peel, causing Slim Shady to slip and fall, allowing for a stealth takedown. This body is also hidden. Agent 47 proceeds through a utility area, picking up another screwdriver, and hides in a laundry cart to evade more guards. He ambushes and eliminates a guard in a red jumpsuit, hiding the body. He later interacts with a television displaying abstract visuals. Returning to the morgue, Agent 47 encounters another instance of Slim Shady. After a brief observation, Agent 47 executes a final melee kill on Slim Shady using a scalpel, completing the objective. He hides the body and then proceeds to locate the mission exit, which is indicated by on-screen prompts. The video concludes with Agent 47 successfully exiting the mission area, transitioning to a mission summary screen. The video opens with a brief glimpse of a game menu featuring a grid of blurred item or achievement icons, with one particular icon highlighted against a purple background. The scene quickly transitions to a post-mission results screen for the game 'Hitman,' where Agent 47, dressed in his signature suit with a red tie, is prominently displayed. The screen highlights a 'Silent Assassin' rating for the mission 'Situs Inversus - The Antithesis - Level 1,' completed in 30 minutes and 5 seconds with a total score of 156,645. As the results are tabulated, various experience point (XP) bonuses rapidly flash on screen, indicating successful stealth actions such as silent takedowns, erasing recordings, and remaining unnoticed, all contributing to the player's overall level. The video concludes with a fade to a black screen displaying the creator's channel name, 'PIXELFUNGAMING,' accompanied by a call to action to 'Like | Share | Subscribe.' 📖 Chapters: 0:00:00 - Loading Screen and Psychedelic Entrance 0:00:13 - Mission Briefing and Initial Navigation 0:00:43 - Outdoor Snowy Environment and Tool Acquisition 0:01:10 - Mortuary Infiltration and First Takedown 0:01:33 - Evidence Destruction and Mortuary Observation 0:02:06 - Scalpel Acquisition and Further Movement 0:02:27 - Target Observation and Distraction Planning 0:02:50 - First Slim Shady Takedown and Body Hiding 0:03:45 - Return to Mortuary and Guard Elimination 0:04:15 - Utility Area Navigation and Concealment 0:05:08 - Interactive TV and Return to Morgue 0:05:35 - Final Target Encounter and Elimination 0:08:55 - Mission Objective Completed and Exit 0:09:40 - Mission Exit and Summary 0:00:00 - Initial game menu screen with item grid 0:00:01 - Hitman post-mission results and Silent Assassin rating 0:00:05 - Display of mission time, score, and rapid XP gains 0:00:23 - Transition to creator's end screen
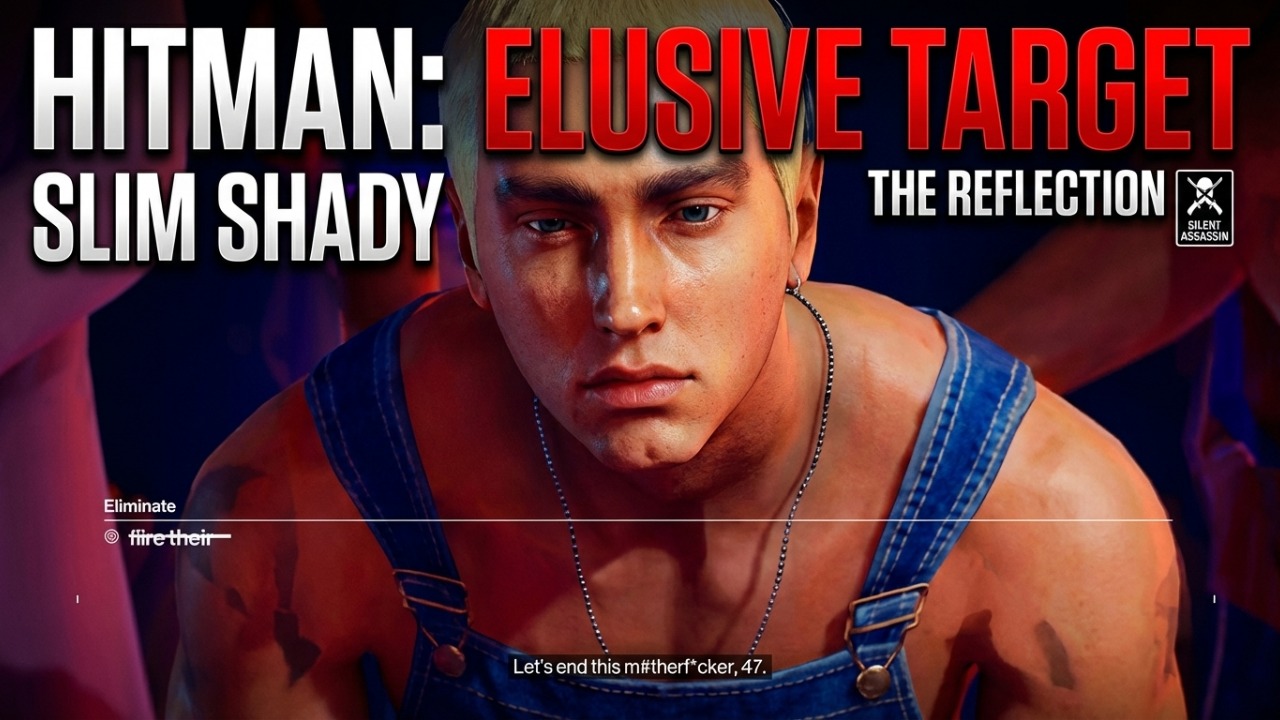
HITMAN: Elusive Target | Slim Shady ''The Reflection" | Silent Assassin #hitman
Agent 47 receives a briefing, learning his target is Slim Shady, who has taken control of the GAMA facility in Hokkaido, transforming it into a chaotic 'childhood playground and insane asylum.' The briefing features rapid cuts between various stylized scenes showcasing Slim Shady's persona, including him on stage, in a kitchen, and interacting with masked individuals and patients. The mission activates, placing Agent 47 in a patient gown within a distorted, psychedelic hallway. The hallway's reality breaks, transitioning Agent 47 into the vibrant, pink-lit outdoor garden area of the facility, which is set up as a large concert venue with screens displaying Slim Shady. Patients roam the grounds, and Agent 47 navigates among them. Moving indoors, Agent 47 enters the 'Mom's Spaghetti' restaurant area where Slim Shady is seen interacting with his entourage and staff, demanding a 'spaghetti sandwich.' A distraction occurs, but Slim Shady remains focused on his meal. Agent 47 then encounters a doctor on the phone, who is distressed about 'weaponized music' and reveals details about a 'testing session,' triggering a mission story called 'Face The Music.' Agent 47 follows the doctor into a private area, subdues him, and dons his disguise. Now masquerading as a doctor, Agent 47 passes through a security checkpoint with masked guards and proceeds to the testing room. Inside, several doctors appear disoriented, and one is already deceased. Slim Shady enters, taunting the doctors and demanding innovative ideas for his 'brain chip.' He rejects a suggestion, abruptly shooting a doctor. Agent 47 speaks with Slim Shady's assistant, a woman with fairy wings, who provides a key and another clue: 'A Strange Photo - Mirror.' Upon interacting with a mirror, Agent 47 is transported into a distorted, dream-like house. The environment is hazy and ethereal, with visual glitches and shifting walls. Agent 47 explores this surreal domestic setting, receiving voice guidance that clarifies 'this is your dream' and he is 'in control here.' The exploration continues through various rooms, culminating in Agent 47 interacting with a cabinet and then breaking a mirror, which concludes the video. Agent 47, wearing a lab coat emblazoned with 'SHADY', begins a mission titled 'Eliminate Slim Shady' and 'Find the Manual' in a surreal, distorted environment. He navigates through rooms that appear to warp and glitch, with reflective surfaces showing alternate realities. A female voice guides him, hinting at unleashing 'the madness'. After interacting with a large mirror, he is transported to a dark, misty corridor where he retrieves a manual glowing brightly on a pedestal. The objective then changes to 'Attend the Testing Session'. He proceeds into a dimly lit, red-hued mortuary or lab area, where he stealthily neutralizes a guard in a control room, hiding the body and destroying surveillance evidence. Moving into a larger room filled with red curtains and medical equipment, he observes several individuals in similar lab coats, some seemingly distressed, while another man in overalls, identified as 'Slim Shady', engages them in a bizarre testing session involving 'Shepard Tone' and misophonia. As Slim Shady addresses the remaining 'failures' and dismisses them, Agent 47 strategically approaches the target, who is fixated on a mirror. Through a unique interaction, Agent 47 pulls Slim Shady through the mirror, eliminating him in a silent takedown. With the target eliminated, Agent 47 exits the area, passing through more reality-bending corridors, ultimately completing the mission with a 'Silent Assassin' rating, achieving high experience and challenges. 📖 Chapters: 0:00:00 - Mission Briefing: Target Slim Shady 0:00:51 - Agent 47 Enters Distorted Facility 0:01:17 - Exploring the 'Mom's Spaghetti' Restaurant and Garden 0:02:10 - Slim Shady Interacting with Staff and Patients 0:03:02 - Slim Shady Orders a 'Spaghetti Sandwich' 0:03:52 - Encountering Doctor and Mission Story Trigger 0:04:29 - Subduing Doctor and Acquiring Disguise 0:06:00 - Entering the Testing Room Disguised 0:07:30 - Slim Shady's 'Brain Chip' Testing Session 0:08:27 - Collecting Clue from Assistant 0:08:50 - Entering the Dream-like House 0:09:50 - Exploring the Surreal Dream Environment 0:00:00 - Entering a Distorted Reality 0:00:35 - Finding the Manual and Objective Change 0:00:44 - Navigating to the Testing Session Area 0:01:01 - Silent Takedown and Body Concealment 0:01:11 - Destroying Surveillance Evidence 0:01:17 - Observing the Testing Session 0:01:22 - Slim Shady's Appearance and Monologue 0:01:30 - Eliminating Slim Shady Through the Mirror 0:01:36 - Exiting the Mission 0:01:50 - Mission Accomplished: Silent Assassin

Ghost Of Yotei: Infiltrating Koga Castle Stealth Walkthrough #ghostofyōtei
A character in traditional Japanese attire, equipped with a bow and dual katanas, approaches a large wooden gate. Peering through a gap, the character observes several armed adversaries guarding a kneeling civilian. Activating a 'Ghost Stance,' the character initiates a swift and brutal assault, performing multiple rapid takedowns against the Mongol forces, indicated by a screen-wide red tint and intense visual effects. Combat continues in an open area, showcasing dynamic swordplay, parries, and dodges against various enemy types, including shield-bearers and polearm wielders. After sustaining damage, the character uses a healing ability before successfully eliminating all remaining threats. Following the intense battle, a cinematic sequence unfolds, featuring a conversation between the protagonist and the rescued civilian, revealed as Jubei. Jubei apologizes for past actions and discusses his reluctance to trust the protagonist regarding an antagonist named Saito, emphasizing Saito's sinister plans for another character, Yukie. The dialogue culminates in a shared resolve to act quickly. The video concludes with a creator's outro screen. 📖 Chapters: 0:00:00 - Approaching the Entrance 0:00:05 - Scouting Enemy Positions 0:00:10 - Activating Ghost Stance and Multi-Kill Assault 0:00:25 - Engaging Remaining Foes 0:00:45 - Mid-Combat Healing and Strategic Takedowns 0:01:00 - Final Enemy Eliminated 0:01:04 - Post-Battle Cinematic Dialogue Begins 0:01:16 - Emotional Revelation and Call to Action 0:01:31 - Characters United by Objective 0:01:36 - Outro Screen 📖 Chapters: 0:00:00 - Approach to the Compound Gate 0:00:05 - Observing Enemies and Captured Civilian 0:00:10 - Confrontation and Ghost Stance Activation Prompt 0:00:13 - Ghost Stance Combat Sequence 0:00:25 - Standard Combat Begins with Ally 0:00:47 - Low Health and Healing Action 0:01:05 - Continued Combat and Enemy Elimination 0:01:31 - Cinematic Dialogue with Jubei 0:01:45 - Conversation on Saito and Past Regrets 0:02:04 - Promises and Alliance Formation 0:02:46 - Jubei Reveals Saito's Plans 0:02:55 - Return to Gameplay and Outro 📖 Chapters: 0:00:00 - Opening Cinematic and Scenic Views 0:00:20 - Koga Fortress Introduction and Dialogue 0:02:11 - Mountain Climbing Gameplay Segment 0:03:12 - Fortress Reconnaissance with Spyglass 0:03:45 - Stealth Infiltration and Initial Assassinations 0:05:00 - Advanced Stealth Tactics and Chain Assassinations 0:06:10 - Navigating Fortress Terrain and Waterways 0:07:00 - Climbing to Elevated Positions for Strategic Advantage 0:07:40 - Observing Prisoners and Planning Rescue 0:08:50 - Continuing Stealth Engagements Within the Fortress 00:10:00 - Stealthy Approach to the Gate 00:10:06 - Discovery of Captives and Enemies 00:10:11 - Initiating Ghost Stance Attack 00:10:25 - Real-time Combat Engagement 00:10:47 - Low Health and Healing During Battle 00:11:15 - Intense Combat Against Multiple Foes 00:11:31 - Post-Combat Dialogue Cutscene Begins 00:11:51 - Protagonist's Reassurance and Jubei's Skepticism 00:12:20 - Discussion of Past Events and Future Threats 00:12:46 - Urgent Revelation of Saito's Plans and Conclusion